How to fabricate branches - Molds
23/06/09 16:05
CREATING BRANCHES
The Trees for the “Secret Alley/Heart of the City” have to be pretty durable/positionable.
This is an example of one of the many steps to creating a tree.
The Molds-
Choose the branch (subject-Ficus tree branch, common street tree in SF; the grey brown planted trees)
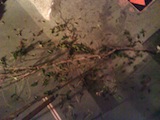
Clean branch from leaf sprees (twigs), so you have your base branch to cast.
Cut branch into cast size segments (varies to type of branch).
Embed more than half of branch (so you don’t have a massive undercut) in clay. Any divots that may make it a problem to take branch out of the mold, fill with just enough clay. Best to make sure there is at least an inch and a half gap around your branch to the walls.

Using cardboard, duct tape, make a sweet tightacle sealed wall. Use a smooth board as a base. I used a the slick side of a masonite scrap. (If the cardboard is weak or too floppy it may absorb the water from the plaster/duracal/ultracal and break, bend, rip and ruin everything. I used the slick side of a box for the inside of the walls, less chance to absorb water... making wood walls is best, just pricier and more time consuming. I used clay pieces to push the walls in tightly.
To note I really duct taped the seams of the cardboard, both sides, a leak in your walls can really ruin your groove.
Molding tails and heads for the pouring access
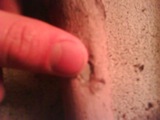
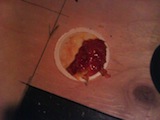
Don’t forget to make keys, something symetrical you can embed into the clay, marbles is a common idea.
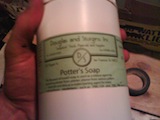
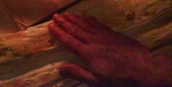
Putting a thin watered down film of “potter’s soap” on the branch for an easier, more successful release. Apply thin, so that you don’t mess up the detail of the branch being molded.
We used “Ultracal” to make the mold of the branch, which I believe is a gypsum-based plaster. Mixing it to a consistency of egg nog, light paint. Make sure when mixing plaster type materials always add powder to water so that you are not too rushed when mixing, achieving a cleaner mix, and can control the consistency.
Since using cardboard I reenforced the top with strips of duct tape, so that the cardboard doesn’t bell out.
 While that shit dries take a hot tub, grab/eat a burrito. Depending on the consistency of your plaster you may have to wait a while to make your other two molds.
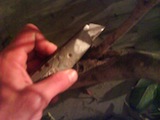
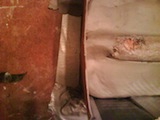
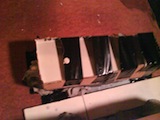
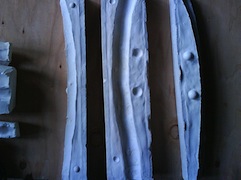
Make sure that you do not remove the branch from any side of the mold till all sides of the branch are fully cast. Unlike the photo below.
Apply a thin layer of Potter’s Soap to the first part of the dry mold and branch.
Construct cardboard/wood walls for the second pour.
(Once again I suggest using wood for walls; wood is reusable, less messy, less risky. If you do use wood, make sure to apply a film of potters soap to the inside of the box.)
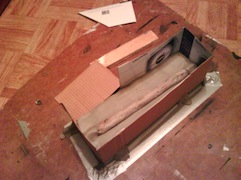
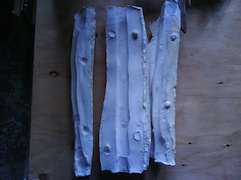
Your final molds will be one 1/2 branch and two 1/4 branches.
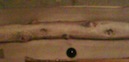
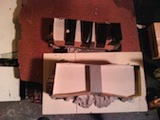
You end up with something that looks like this:
This next mold is with wood walls (Created by Cody):
Strap the mold together with duct tape or bungee cords.
Use duct tape and/or a plug to prevent your casting material from running out the bottom of the mold.
Fill up the mold with “Flexible Slip”, a plaster latex compound.
Your goal is to just coat the inside of your mold with your material. Turn the mold over and dump out most of the “Flexible Slip”, allowing a film of material to stay in the mold and dry.
Depending on the consistency of the “Flexible Slip”, it will dertermine how many times you fill and empty the mold.
Try not to let the “Flexible Slip” sit too long or too little in the mold.
Too little, your branch will rip.
Too long makes the mold difficult to take apart, you may end up ruining you mold, cracking it, what have you.
We waited to pull the casts when dry to the touch or a little drier then dry to the touch.
When you get your style down, you can easily produce branches over and over.
We made six sets of molds, two of a large branch and four of a smaller one. Our sets allowed us to variate the structure of each branch.
Now on to the next step: Assembling the pieces!
The Trees for the “Secret Alley/Heart of the City” have to be pretty durable/positionable.
This is an example of one of the many steps to creating a tree.
The Molds-
Choose the branch (subject-Ficus tree branch, common street tree in SF; the grey brown planted trees)
Clean branch from leaf sprees (twigs), so you have your base branch to cast.
Cut branch into cast size segments (varies to type of branch).
Embed more than half of branch (so you don’t have a massive undercut) in clay. Any divots that may make it a problem to take branch out of the mold, fill with just enough clay. Best to make sure there is at least an inch and a half gap around your branch to the walls.
Using cardboard, duct tape, make a sweet tightacle sealed wall. Use a smooth board as a base. I used a the slick side of a masonite scrap. (If the cardboard is weak or too floppy it may absorb the water from the plaster/duracal/ultracal and break, bend, rip and ruin everything. I used the slick side of a box for the inside of the walls, less chance to absorb water... making wood walls is best, just pricier and more time consuming. I used clay pieces to push the walls in tightly.
To note I really duct taped the seams of the cardboard, both sides, a leak in your walls can really ruin your groove.
Molding tails and heads for the pouring access
Don’t forget to make keys, something symetrical you can embed into the clay, marbles is a common idea.
Putting a thin watered down film of “potter’s soap” on the branch for an easier, more successful release. Apply thin, so that you don’t mess up the detail of the branch being molded.
We used “Ultracal” to make the mold of the branch, which I believe is a gypsum-based plaster. Mixing it to a consistency of egg nog, light paint. Make sure when mixing plaster type materials always add powder to water so that you are not too rushed when mixing, achieving a cleaner mix, and can control the consistency.
Since using cardboard I reenforced the top with strips of duct tape, so that the cardboard doesn’t bell out.
While that shit dries take a hot tub, grab/eat a burrito. Depending on the consistency of your plaster you may have to wait a while to make your other two molds.Make sure that you do not remove the branch from any side of the mold till all sides of the branch are fully cast. Unlike the photo below.
Apply a thin layer of Potter’s Soap to the first part of the dry mold and branch.
Construct cardboard/wood walls for the second pour.
(Once again I suggest using wood for walls; wood is reusable, less messy, less risky. If you do use wood, make sure to apply a film of potters soap to the inside of the box.)
Your final molds will be one 1/2 branch and two 1/4 branches.
You end up with something that looks like this:
This next mold is with wood walls (Created by Cody):
Strap the mold together with duct tape or bungee cords.
Use duct tape and/or a plug to prevent your casting material from running out the bottom of the mold.
Fill up the mold with “Flexible Slip”, a plaster latex compound.
Your goal is to just coat the inside of your mold with your material. Turn the mold over and dump out most of the “Flexible Slip”, allowing a film of material to stay in the mold and dry.
Depending on the consistency of the “Flexible Slip”, it will dertermine how many times you fill and empty the mold.
Try not to let the “Flexible Slip” sit too long or too little in the mold.
Too little, your branch will rip.
Too long makes the mold difficult to take apart, you may end up ruining you mold, cracking it, what have you.
We waited to pull the casts when dry to the touch or a little drier then dry to the touch.
When you get your style down, you can easily produce branches over and over.
We made six sets of molds, two of a large branch and four of a smaller one. Our sets allowed us to variate the structure of each branch.
Now on to the next step: Assembling the pieces!
0 Comments